
How to Mail Documents From Your Desk Using an Online Service
You don’t need to visit the Post Office to send a business document. To learn how to mail documents without leaving your desk, upload your file to an online print-and-mail service, enter the recipient’s details, and submit the order. The service prints, folds, prepares, and mails the document for you.
That means no printing at the office, stuffing envelopes, or fitting a trip into an already full day. You stay in control of the document and mailing details while the physical steps move out of your hands.
This guide walks through the process, from preparing your file to checking the mailing details. You’ll learn what to upload, how to enter a complete recipient address, and what to review before submitting, so your document can move from a digital file to a mailed letter with fewer manual steps.
Key Takeaways
- Send a physical letter online by uploading a document and entering the recipient’s mailing details, without printing it yourself or visiting the Post Office.
- Use a clear, complete PDF and enter the address carefully to help prepare the mailing accurately.
- Review the document, recipient information, and mailing selections before submitting your order.
- An online print-and-mail service can handle the transition from digital file to printed, sealed, and posted letter.
- For ongoing business mail, Postal Methods’ Email-to-Mail Service can help move documents from email into the mailing process.
What Is the Most Secure Way To Send Documents by Mail?
For tracking and proof of delivery, choose USPS Certified Mail and keep its mailing receipt and delivery record. If nobody signs at delivery, the recipient must pick up the item at the post office. To mail legal or time-sensitive documents with Certified Mail online, select it during checkout when available, then review the delivery details before submitting.
- Choose an online mailing method that fits the document. A mailing service can turn a digital file into a physical letter without your printer, envelopes, or post office visit. Online letter composition tools may let you create a letter before submitting it; upload-based services instead start with a finished document. Select a method based on whether you need to compose, print, or mail the file. Review its capabilities, including available delivery and tracking choices.
- Use a computer or mobile app to submit the mailing. Sign in to the online service, upload the document, and enter the recipient’s address and return address. A computer can make it easier to review a longer file, while a mobile app can help you submit a prepared letter away from your desk. Before paying or submitting, confirm the recipient, page order, and mailing selections. The service can then prepare the physical letter without requiring you to print it.
- Select Certified Mail when delivery documentation matters. It does not automatically include insurance, so don’t treat the service as coverage for the document’s contents. If no one signs at delivery, additional steps may be needed before the item reaches the recipient. These details matter for legal notices and other letters where a record of mailing and delivery is important.
- Consider Registered Mail for documents needing extra handling. Delivery can take longer than faster mailing options, so it may not suit a deadline-sensitive filing. Compare the handling and delivery needs of the specific document before choosing it. For an original document or special handling, a human assistant or concierge can manage the physical mailing task.
- Keep originals and digital copies distinct. An online service mails a printed copy of the file you submit; it does not send your physical original. For example, upload a PDF copy when the recipient accepts a printed reproduction. If the recipient requires an original signed document, arrange for a person to handle that original directly. This distinction helps you choose an efficient online workflow without mistaking mailed copies for physical originals.
Desktop and mobile mailing tools can let a paralegal finishing a filing at 7 PM ship it without waiting until morning, which may help when work runs late.
Uploading PDFs and entering recipient addresses
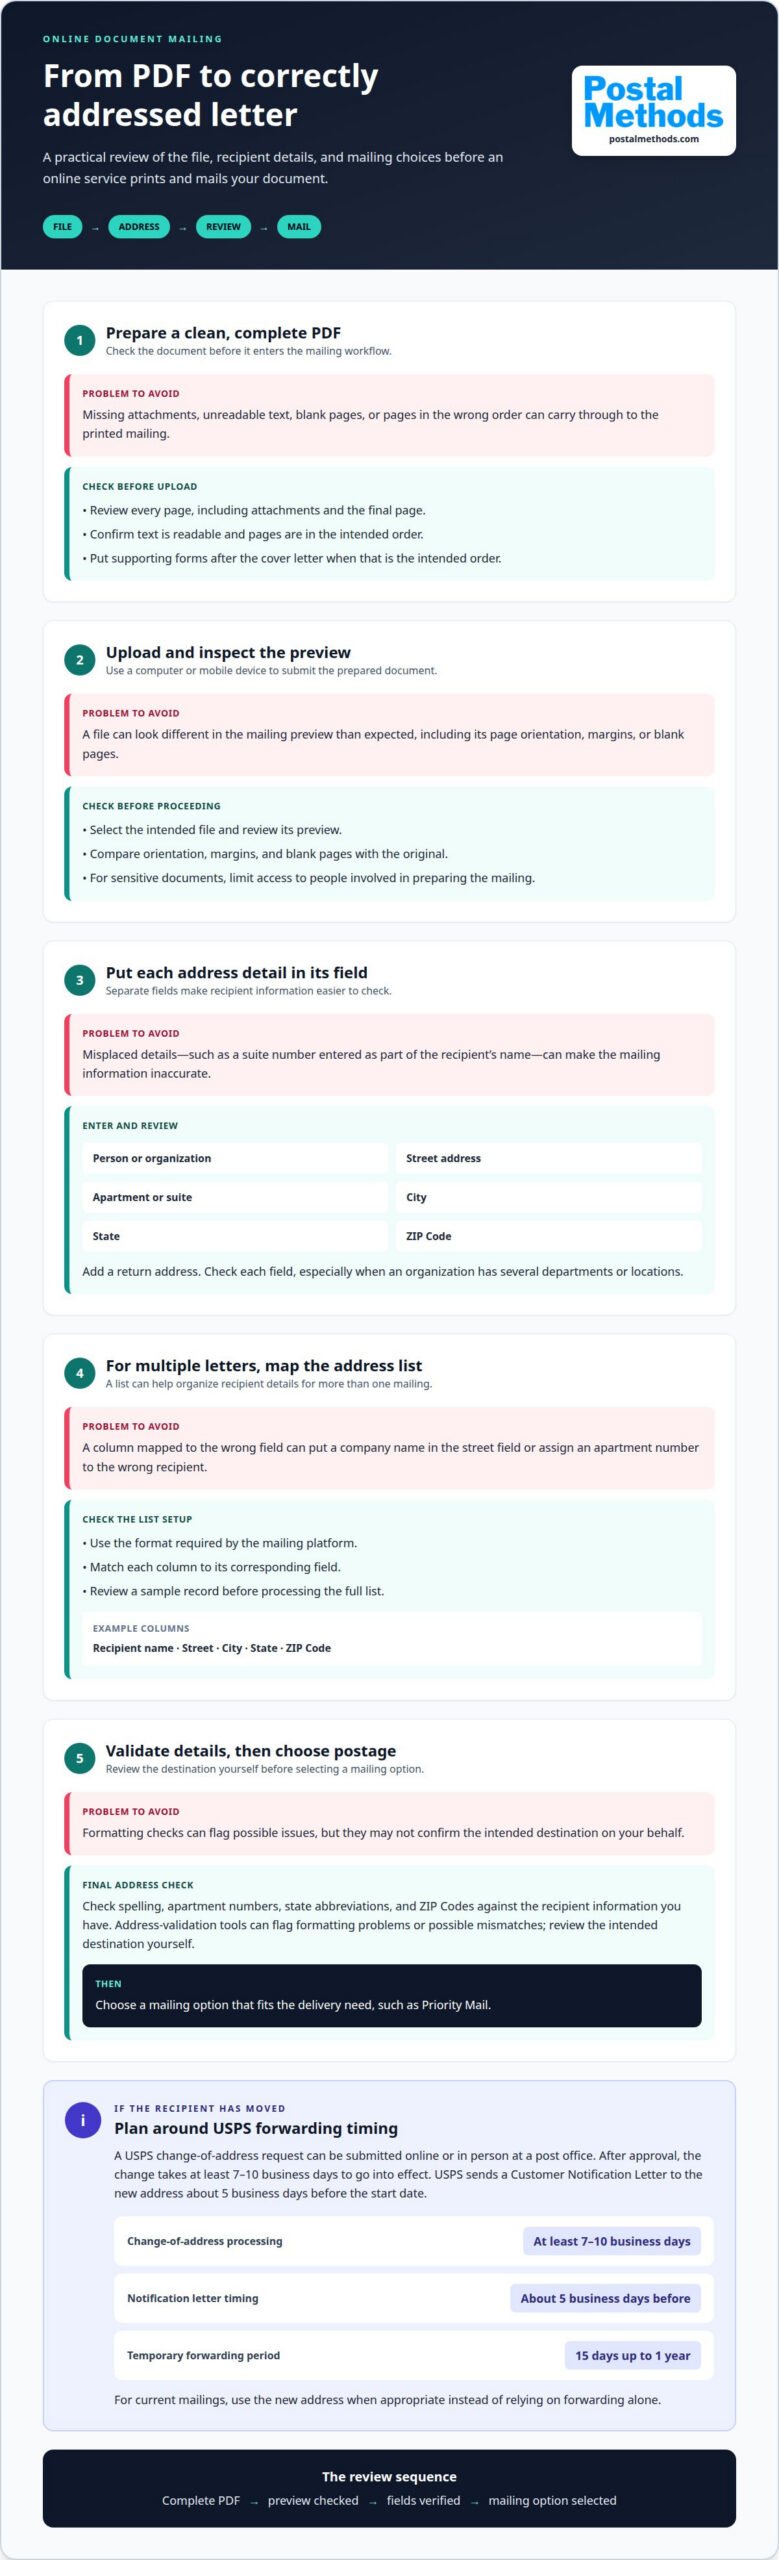
- Prepare a clean PDF before uploading. Open the file and review every page, including attachments and the final page. Confirm the text is readable and the pages appear in the intended order. For example, place a cover letter before its supporting form. A complete, correctly ordered PDF helps prevent missing or misplaced pages in the printed mailing. To mail documents without leaving your desk, prepare the file digitally and submit it with the correct destination.
- Upload the document from your computer or mobile device. Select the intended file in the mailing service and review its preview. Check page orientation, margins, and blank pages against the original. For sensitive documents, limit access to people involved in preparing the mailing. A computer can make detailed review easier, while a mobile device lets you submit a prepared document away from your workstation.
- Enter the recipient’s address in separate fields. Add the person or organization, street address, apartment or suite, city, state, and ZIP Code in their designated fields. For example, place “Suite 240” with the street address, not the recipient’s name. Add a return address as well. Review each field before proceeding, especially when the recipient’s organization has several departments or locations.
- Upload an address list for multiple letters. Use the format required by the mailing platform, then match each column to its corresponding field. A list might include recipient name, street, city, state, and ZIP Code. Review a sample record before processing the full list. This helps catch errors, such as a company name entered in the street field or an apartment number assigned to the wrong recipient.
- Validate the address details before selecting postage. Check spelling, apartment numbers, state abbreviations, and ZIP Codes against the recipient information you have. Address-validation tools can flag formatting problems or possible mismatches, but review the intended destination yourself. Once the address is ready, choose a mailing option that fits the delivery need, such as Priority Mail.
- Submit a change of address through the channel that suits you. A USPS change-of-address request can be submitted online or in person at a post office. After approval, the change takes at least 7-10 business days to go into effect. USPS sends a Customer Notification Letter to the new address about 5 business days before the start date.
- Plan around the forwarding start date. USPS allows temporary change-of-address requests for relocations lasting 15 days up to 1 year. For current mailings, use the new address when appropriate instead of relying on forwarding alone. For an office sending recurring documents, knowing how to mail documents without leaving your desk can simplify the handoff: keep prepared files and recipient details organized for each mailing. An online document mailing workflow can move those details into the mailing process.
Online print-and-mail service workflow
An online workflow takes a document from digital submission to physical mailing. You provide the file and recipient details, choose the available mailing options, and submit the order for processing.
-
Use an Online Print-and-Mail Service
Start by opening Postal Methods’ QuickSend portal and choosing a workflow: compose a letter, upload a document, create a mail merge, or send multiple documents. You can also submit by email or RESTful API. Enter the recipient and return addresses, then review the document and details before submitting. A saved draft is not a mailed letter: submit the completed order to begin processing.
- Prepare the file and mailing details together. Match each document to its intended recipient before creating an order. For example, pair a contract with the correct company address rather than relying on memory later. For multiple letters, organize each recipient’s details with the corresponding file. This helps keep documents and addresses aligned through the workflow.
- Choose a delivery priority that fits the mailing. Review the available service and delivery options before placing the order. A routine notice and a deadline-sensitive contract may call for different priorities. If a mailing needs a delivery record, consider Certified Mail where available. Remember that Certified Mail does not automatically include insurance, and recipients may need to collect unsigned items at the post office.
- Review the order before releasing it. Confirm the recipient, return address, document version, and selected mailing option. Check that a contract’s pages appear in the right order and that no unrelated file is attached. Correct errors before submission. This final review can catch a mismatched recipient or outdated document before the order becomes a physical mailing.
-
Have Documents Printed, Folded, and Mailed
Submit the approved order so the service can print, fold, prepare, and mail the document. The online process replaces handling paper, envelopes, and postage yourself. Before submitting, make sure the file is final and the selected option matches the mailing’s purpose. Avoid assuming that a digital upload sends an original signed paper document.
- Keep the order record with its related documents. Save the confirmation and associate it with the contract, notice, or other mailed item. For recurring correspondence, use a consistent naming system, such as recipient name and document type. That makes it easier to identify which file was submitted and connect the mailing record to the right business task.
Printing, inserting, sealing, and postage handled by the service
Once you submit a mailing, printing, envelope preparation, and postage can happen without your office printer. Choose whether the service or your team will handle each physical step.
-
Prepare and Package Documents
Upload the final document and select its intended recipient before submitting the order. For a multi-page contract, confirm every page appears in sequence and no blank page follows the signature page. Include any enclosure in the same file or order it according to the service’s workflow. The service mails a printed copy, so don’t send a physical original when you intend to mail only a copy.
- Match each file to its mailing. For several recipients, organize documents and addresses together so each letter reaches the intended person. For example, pair an invoice PDF with its customer’s address, not a general office contact. Review the document preview and recipient details before approval. This helps prevent a correct document from going into the wrong envelope.
-
Have the Service Handle Printing and Postage
Submit the approved order for printing, folding, inserting, sealing, and postage. The service converts your digital file into a prepared physical letter, so you don’t need to print pages or supply envelopes. Check the selected mailing class and any delivery options before release. For example, a routine invoice may need different handling from a notice requiring a delivery signature.
- Choose the mailing method for the item. Letter size, weight, destination, and desired delivery service affect the postage selection. That stamp figure applies to First-Class letter postage, not packages or a print-and-mail service order.
-
Print Postage and Shipping Labels Online
If you’re mailing a document yourself, select appropriate postage online and print the label or stamp. Match it to the package or envelope, then attach it flat and visibly. For a standard letter, online First-Class Mail postage can be purchased as a stamp. Don’t use a letter stamp for a package that requires a shipping label.
- Verify the finished mailing details. Before sending, check the recipient address, return address, postage, and any selected signature option. For example, confirm the suite number remains visible after folding. If the service handles preparation, review the digital order details rather than expecting to inspect the sealed envelope yourself. Keep the order record with the related contract, invoice, or notice.
How to print postage and shipping labels online for documents
For self-mailing, buy postage online, print the label, and attach it to your prepared mailpiece. Follow these steps to match the label to the document and destination.
- Choose the mailing format first. Decide whether you’re sending a standard letter or a package containing documents. A flat envelope and a rigid document mailer may need different postage and label formats. Select the format that matches the physical mailpiece, not just the PDF pages. If Postal Methods handles fulfillment, its online workflow takes care of printing and postage.
- Enter the sender and recipient details. Add the recipient’s full name, street address, city, state, and ZIP Code. Include an apartment or suite number where needed. Enter a return address so undeliverable mail has a sender. For example, compare the label preview with the address on your order before buying postage.
- Select the mail class or shipping service. Choose an option that fits the document’s delivery needs and physical format. USPS First-Class Mail is one option for letter mail. For a package, use a shipping service that accepts its dimensions and weight. Review any tracking, signature, or delivery features shown before completing the purchase.
- Provide accurate package information. For a document mailer, enter the details requested by the postage tool, including its weight and dimensions when applicable. An incorrect entry can produce a label that doesn’t match the item being sent. Use the sealed mailpiece’s actual measurements rather than estimating from the document alone.
- Preview and print the label. Check that the recipient and return addresses are legible and correctly placed in the preview. Print the label at its intended size, without cropping the barcode or address block. If the print is faint or incomplete, print a clean copy before attaching it to the envelope.
- Attach the label securely. Place it on a flat, visible area of the envelope or mailer. Keep folds, seams, tape, and handwritten marks away from the barcode. For example, don’t cover the barcode with tape if glare could interfere with scanning. Match the printed label to the exact mailpiece you prepared.
- Keep the mailing record. Save the online receipt and any tracking details with the document’s file. This makes it easier to connect a mailed contract or notice with its postage purchase. If you’d rather send a document for printing and mailing through an online workflow, submit documents for online mailing.
USPS officials said postal employees work around the clock to ensure customers receive important letters and packages. Keep the mailing record with the document’s details in case you need to review the shipment later.
If you move, note that after the mail forwarding period ends, USPS returns mail to the sender for 6 months with a label showing the new address. USPS forwards Media Mail, but the customer must pay the shipping cost from the local Post Office to the new address. These forwarding details can affect what happens to mailed documents and what costs may apply.
Postal Methods: Email-to-Mail Service
Postal Methods’ Email-to-Mail Service turns digital documents into physical mail, without requiring you to print, fold, or seal each letter yourself. Use it when recurring business correspondence or individual documents need to move from email to a mailed delivery. The service can handle the printing and mailing steps, while you provide the document and recipient details.
For specific needs, Postal Methods also offers HIPAA Compliant Printing & Mailing Services, Invoice Printing and Mailing Services, and Legal Printing and Mailing Services. These options support sensitive medical documents, invoices, and legal correspondence through a print-and-mail workflow. Contact Postal Methods to discuss your document mailing needs.
Make your next mailing part of the workflow
A repeatable process for how to mail documents without leaving your desk starts with a clear handoff. Decide who prepares the file, who approves recipient details, and where the order record belongs. This routine can make recurring correspondence easier to manage and reduce last-minute scrambling when another letter needs to go out. Keep the document, mailing instructions, and confirmation together so the next person can follow the same process.
For a one-time letter, submit the prepared file through the online mailing process. For ongoing business mail, consider whether a consistent digital handoff fits your team’s daily operations. Use a straightforward naming approach for files and records, so each mailing is easier to identify later. The right next step gives each document a clear owner and moves it forward without unnecessary manual work.
Contact Postal Methods for help with your document mailing needs. A smoother routine can leave more room for the work your team needs to do next.
Frequently Asked Questions
Do I need to go to the Post Office?
No. An online print-and-mail service can accept your document and recipient details digitally, then handle printing and mailing. You can also buy postage online and prepare the letter or package yourself. If you’re mailing a package, USPS lets customers schedule a free carrier pickup online and tell the local post office where to leave it. That option avoids a counter visit, though you still prepare the package.
How do I mail documents online from home or office?
Choose an online mailing option, upload your document, and enter the destination and return addresses. Review the file and mailing details before submitting. For business correspondence, Postal Methods accepts submissions through its web portal, email, or API. Some print-and-mail services may offer options for handling sensitive business documents. This approach can help businesses send documents without managing printing and postage in-house.
How can I send documents by USPS without going to the post office?
Prepare the document in an envelope or package, purchase postage online, and print the label or stamp. Attach it clearly, then schedule a free USPS carrier pickup online and specify where the carrier can collect the item. For a document you don’t want to print or package yourself, an online print-and-mail service can handle those steps. Select the option that matches your needs and the mailpiece you’re sending.